
Knowledge
Frequently asked questions
Everything CPOs and users ask about Your® Liner — scanning, ordering, thickness control, suspensions, aesthetics, shipping and care. Browse by topic below.
Does insurance cover Your® Liner? What does it cost?
In most of the countries we serve, custom liners can be covered by health insurance when your prosthetist documents the clinical need — every case report on our use-case pages exists exactly to support that conversation with your insurer. Pricing itself goes through your prosthetist (CPO), who orders on your behalf; MotionTech does not sell directly to patients. The practical route: find a certified centre near you and ask them about coverage for your situation — they handle the paperwork with reimbursement agencies.
New to Your® Liner? Here’s where you start!
You just found out about our activities and are wondering where to start? This FAQ section is a great start!
You can also check the following links:
Discover all the features of Your® Liner
Fill a dummy order to see what info you will need to collect when placing an order
See concrete examples of how Your® Liner is used in the field by other professionals
If you can’t find what you’re after in these, feel free to get in touch, we’ll be happy to answer your questions
What material is a Your® Liner made of?
The cushioning layer of a Your® Liner is 100% made of silicone. We provide 3 different types of silicones: a low Shore hardness “Relax”, a medium hardness “Active”, and a higher hardness “Dynamic”. Please contact your local MotionTech representative to receive a set of Pads displaying the hardness of these materials.
All our silicones are certified skin-safe, and have been tested and evaluated according to EN ISO 10993-1.
Your® Liners include a made-to-measure fabric cover to provide enhanced durability, and facilitate donning & doffing.
What is the shelf life of a Your® Liner?
For reasons of hygiene and safety, we recommend replacing the Your® Liner after 6 months at the latest, regardless of the condition of the material. The maximum recommended service life is limited to 6 months to ensure proper function, safety and hygiene.
However, the actual shelf life may also depend on the individual conditions of use, care and handling. The Your® Liner is covered by a 6-month product warranty covering defects in materials and workmanship. This guarantee applies in addition to the statutory warranty rights. Please note that wear and tear due to normal use is not covered by the guarantee.
Notes on use and service life
Liners made of softer silicone (Relax) are more comfortable, but can wear out more quickly under intensive use than liners made of medium (Active) or harder silicone (Dynamic).
For patients with increased mechanical stress (e.g. high activity level, high body weight, short residual limb structure leading to high pressure), the use of a liner made of Dynamic silicone is recommended to ensure the best possible function and safety during the recommended 6-month period of use.
What kind of scanner / scan format is needed?
You can use any scanner as long as you can output an .stl, .ply or .obj file.
High quality structured light scanners tend to provide more reliable results, but many CPOs are getting great results with Your® Liner using less expensive iPad or iPhone-based scanners. Indeed, as liners are flexible, the need to have an extremely accurate scan is probably less crucial to obtaining good results as it may be for prosthetic sockets.
Please note we prefer working with scans which include the colour. This allows to visually locate the indications drawn on the limb (e.g. location of measurements, drawn zones for thickness control)
In what position should I scan my patient?
General principles
- #1: Don’t push-up the soft tissues — We want soft tissues pulled down into the liner as much as possible to avoid pistoning.
- #2: Scanned shape = shape when donning — To ensure proper liner fit, the scanned shape should be as close as possible to the shape the limb will have when the patient dons the liner.
- #3: Find a comfortable position — If your patient moves, the scan has higher chances of being deformed or contain dimensional error.
Scanning positions
By order of preference:
- #1: Standing — This allows soft tissues to hang down to limit pistoning. If patient can’t stand still, move to:
- #2: Sitting — Position your patient on a high support (high stool, corner of a table, height controlled bed) so it is easier to scan the distal and posterior areas. For AK patients, ensure the patient sits on the edge so the posterior area is visible to the fullest possible extent.
- #3: Scan positive from plaster cast — If soft tissues make the shape impossible to properly scan, a cast can help control soft tissues to obtain viable shape. Important: position soft tissues as desired during casting, but do not rectify the positive (don’t apply reductions) before scanning.
Important extra tips
- Take videos! Show us how soft tissues move (palpating, pushing, moving the limb) and tell us more about the limb and it’s needs with your own words
- Scan with desired knee-flexion. Re-working the knee flexion digitally can introduce errors. The best is to scan directly with the desired flexion angle you want the liner to have.
- Should I use a stocking? Generally: no. Stockings can hide concavities and scars. They help constrain soft tissues but risk of hiding / smoothing out important shape features. If the limb has no scar and no concavity, you may use a stocking, but we generally don’t recommend it.
BK: Which flexion angle?
Take the scan (and the measurements!) with the same flexion angle that you want the liner to have.
When we need to correct the flexion angle of the liner, there is a risk that the obtained volume is modified and that compressions are not optimal.
A bit of pre-flexion can lower the mechanical stress applied by the liner on the patella when sitting or when the knee is bent. However, a liner with too-much pre-flexion might create a fold on the patella when standing or when the knee is straight.
Depending on the user activities, it might therefore be better to have a straight liner, or to have a bit of pre-flexion.
Generally, we recommend having about 20° pre-flexion. We do not recommend having more than 40° pre-flexion.
Also make sure to take the control measurements in the same position as the scan, as tissues can move and create a wrongful impression that the scan contains dimensional error, which might lead to a liner with unadapted compressions.
Should I clean / smooth my 3D scan before uploading the file?
No! We prefer raw scans.
When cleaning / re-working your scan, some operations like smoothing out the scan can modify the overall volume, or modify some local shapes.
As we provide a satisfaction warranty (we change the product on our costs if it doesn’t fit), we prefer working from the original scan and measurements, so we can make sure all operations which are applied on the 3D model are done according to our quality standards.
This way, if the liner doesn’t work, there’s no questions on whom to point the finger at… 😅
Furthermore, if you want to make sure we made adequate modifications on the scan, you can request a 3D model validation, where you can inspect the 3D model we made prior to launching the print.
Any scanning tips?
#1: Find a suitable location
Taking a 3D scan in an unadapted space can prove to be a rather frustrating experience. To avoid those:
- Make sure you have enough space to move around without being restricted.
- Check the lighting conditions: no direct exposure to sunlight, not too dark.
- Check that the floor doesn’t cause issues: some reflecting surfaces can cause issues with some scanning technologies, where the scanner can’t detect the floor.
#2: Calibrate and test your equipment beforehand
Make sure to calibrate your scanner regularly! (If you have any questions about this, please feel free to contact us). Also, running a quick test to make sure your setup is working properly can avoid bad surprises on D day when the patient is in front of you.
#3: Take control measurements
Even highly experienced CPOs with the best scanners can sometimes get unexpected results. Patients can move, scanners can loose their references, calibration can be outdated, light conditions might impact scan quality… So to optimise the chances that the 1st liner fits great right away, we recommend taking extra control measurements so we can control the dimensions of the scan. Remember to draw directly on the limb the heights at which you took the measurements to ensure we can more accurately control your scan.
#4: Ensure key areas of the scan aren’t missing
Small holes in the scan aren’t a problem, as long as they are not located in a key area. It’s of course better not to have any. But if you do, make sure that those holes are not located in key areas before you let your patient go.
#5: Sit back and trust the process!
We’re aware that prosthetics can sometimes be as much of an art as it is a science. That’s why we not only have talented and experienced staff to deliver the optimal 3D model, but also a satisfaction warranty. If the 1st liner doesn’t fit, we’ll change it under warranty until we deliver the great liner we all want.
What are Your® Liner’s Default Thickness Profiles?
Your® Liner always come with a Default Thickness Profile. This profile is different for each amputation type, and for each silicone type.
If each profile is adjusted to optimally match the general characteristics of the amputation type and the chosen silicone properties, all profiles always present the following characteristics:
- Tapered from distal to proximal: Distal extremity is thicker, and the thickness gradually decreases towards the proximal end. For BK limbs, the thickness reaches its minimum at knee level to facilitate flexion, and remains thin all to way to the proximal end.
- Symmetrical all around limb: At a given height, the thickness is the same in all directions (anterior, medial, lateral, posterior)
- Adjusted to the length: We adapt the thickness gradient to the limb’s length. For example, by default, we always minimise the thickness at the knee joint level.
In details, here is what we do (values in [mm]):
Ankle disarticulation
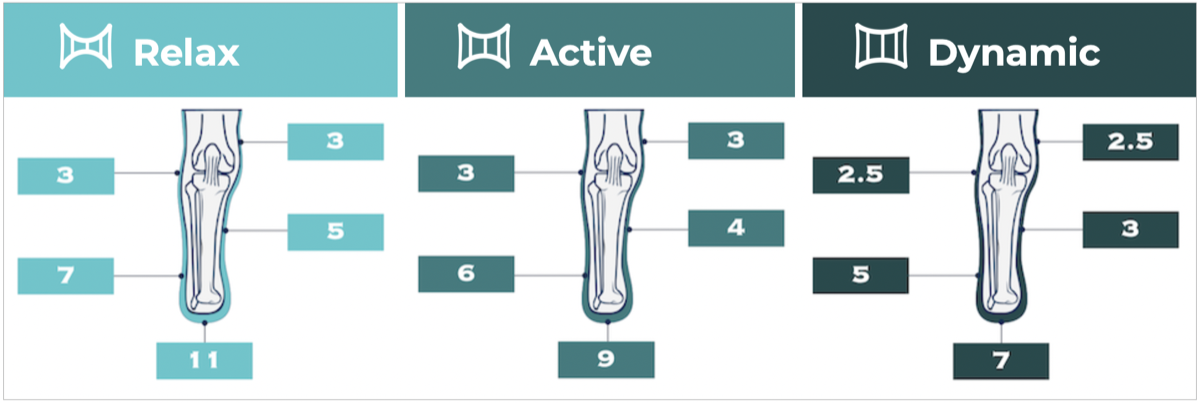
Transtibial
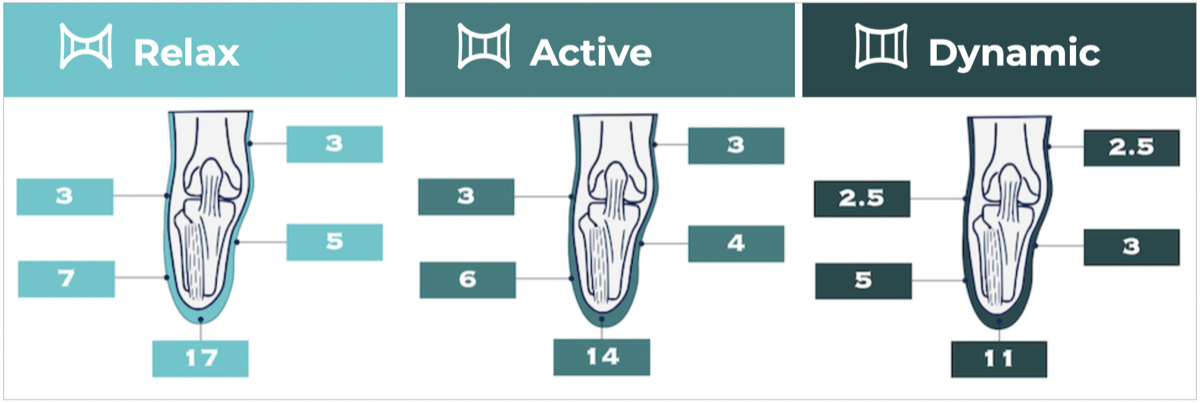
Knee disarticulation
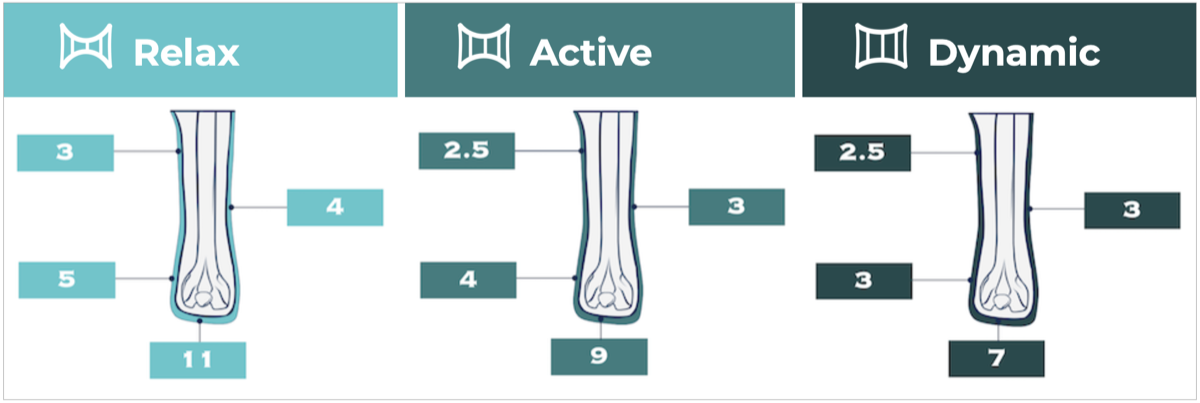
Transfemoral
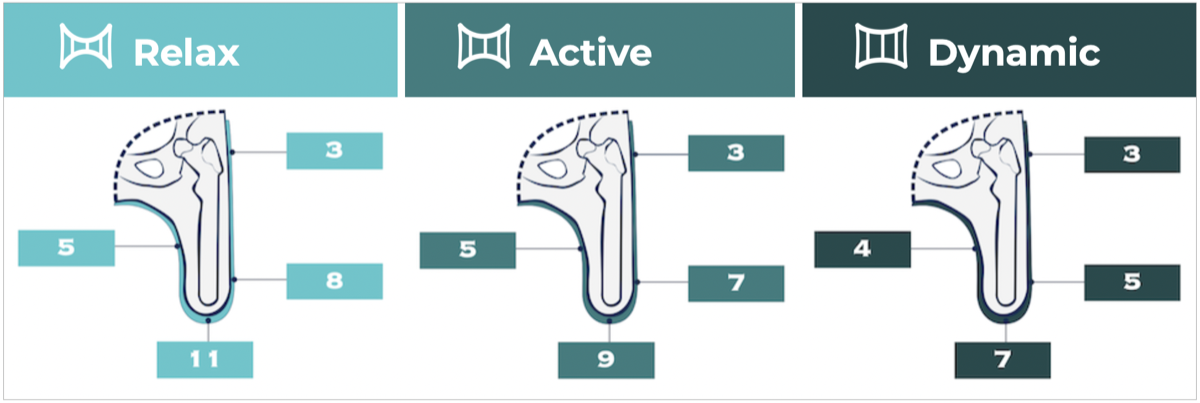
Other?
For some amputation / limb-difference types, we don’t necessarily have a defined thickness profile yet (e.g. dysmelie, rotationplasty, etc.). We usually define those on a case by case basis, in consultation with the prosthetist.
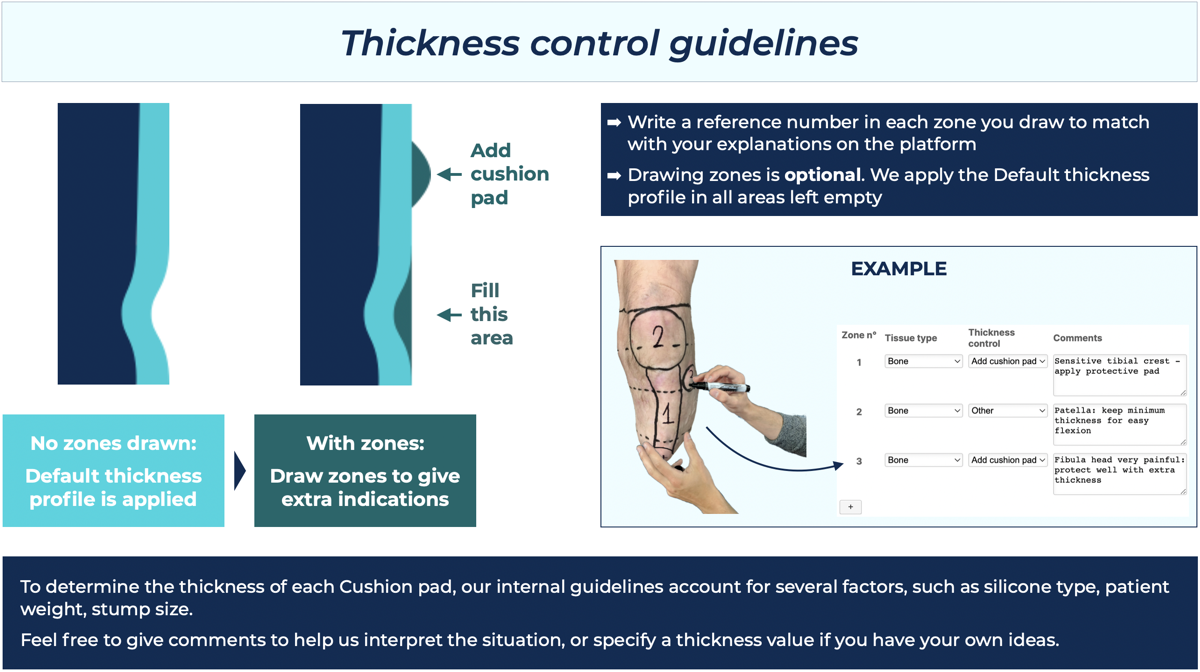
How to add pads / fill invaginations?
You can always add pads / fill invaginations by drawing a zone around the area in question:
How to compensate pear-shaped limbs?
If what you’re after is compensating a pear-shaped limb to facilitate socket entry, then it’s not Zones that you need to draw (although you also can, we’ll most likely understand).
On the 1st page of the Order Form, select “Yes” to the question “Is this residual limb pear-shaped?”. Then, select “Without boa / soft socket: liner must compensate pear shape” to the question “What socket type do you intend to make?”.
For more questions on Pear-shaped limbs, see the “Pear-shaped limbs” section of the present FAQ page.
Is there a minimum / maximum thickness?
Technically, we can print both very thin and very thick liners. We don’t do too-thin to avoid durability issues. We don’t do too-thick to avoid weight, pistoning and donning & doffing issues.
Our current indications:
- Min thickness: 2,5mm for Active and Dynamic silicone, 3mm for Relax silicone
- Max thickness: 25mm
Which suspension options for Your® Liner?
You can add three types of suspension components on Your® Liner:
#1: Add distal locking system
Our locking systems come in M10 or M6 thread. The size of the cup is chosen by our designers to optimally match with user’s limb shape.
#2: Add silicone rings BELOW knee-level
Such rings can be used either to block the rotation of the limb inside the socket, or to implement a vacuum socket (without using a sleeve).
#3: Add silicone rings ABOVE knee-level
Such rings are used to enhance the seal between the liner and the sleeve. With those, the sleeve can be cut shorter than the liner, and therefore prevent pinching of the skin at the proximal edge of the liner. For AK liners, the same options are available.
In the Order Form, if you select no to all above options, you will get a simple Cushion liner (i.e. silicone layer + fabric cover).
Can I combine those?
Yes you can. Although having a liner with both below-knee and above-knee silicone rings would not often make sense as the sleeve will anyhow block the rotation, there can be some cases where it does.
A pin-lock system and silicone rings can be added simultaneously onto a liner.
Do you do fabric-less liners?
No.
As our silicones are sticky, donning a fabric-less liner would imply the need to apply a cream onto the outer surface of the liner to make it non-sticky. Not great for usability and keeping the socket clean.
Also, with no fabric, silicones are more easily prone to tear, and we couldn’t guarantee a similar durability if we simply didn’t add a fabric.
If you plan to implement a vacuum suspension system, check out our silicone rings suspension options.
Can I print anything on a Your® Liner?
Yes, you can ask us to print pretty much anything on Your® Liner. HOWEVER, we do have the following limitations:
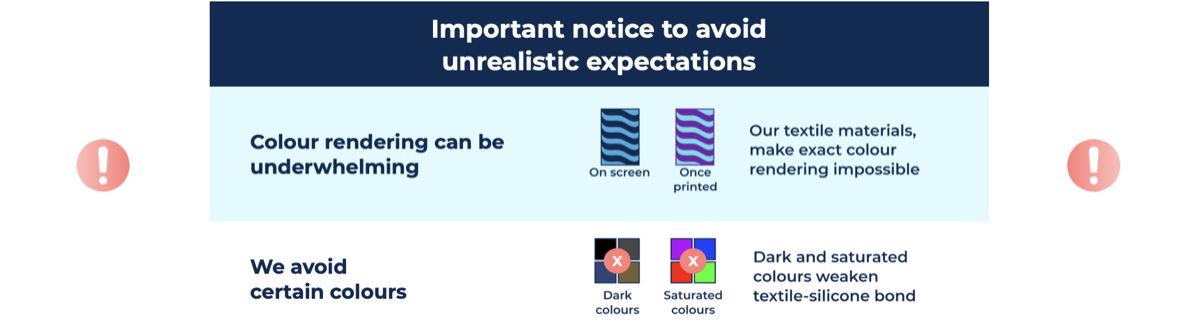
Furthermore, please observe the rules below:
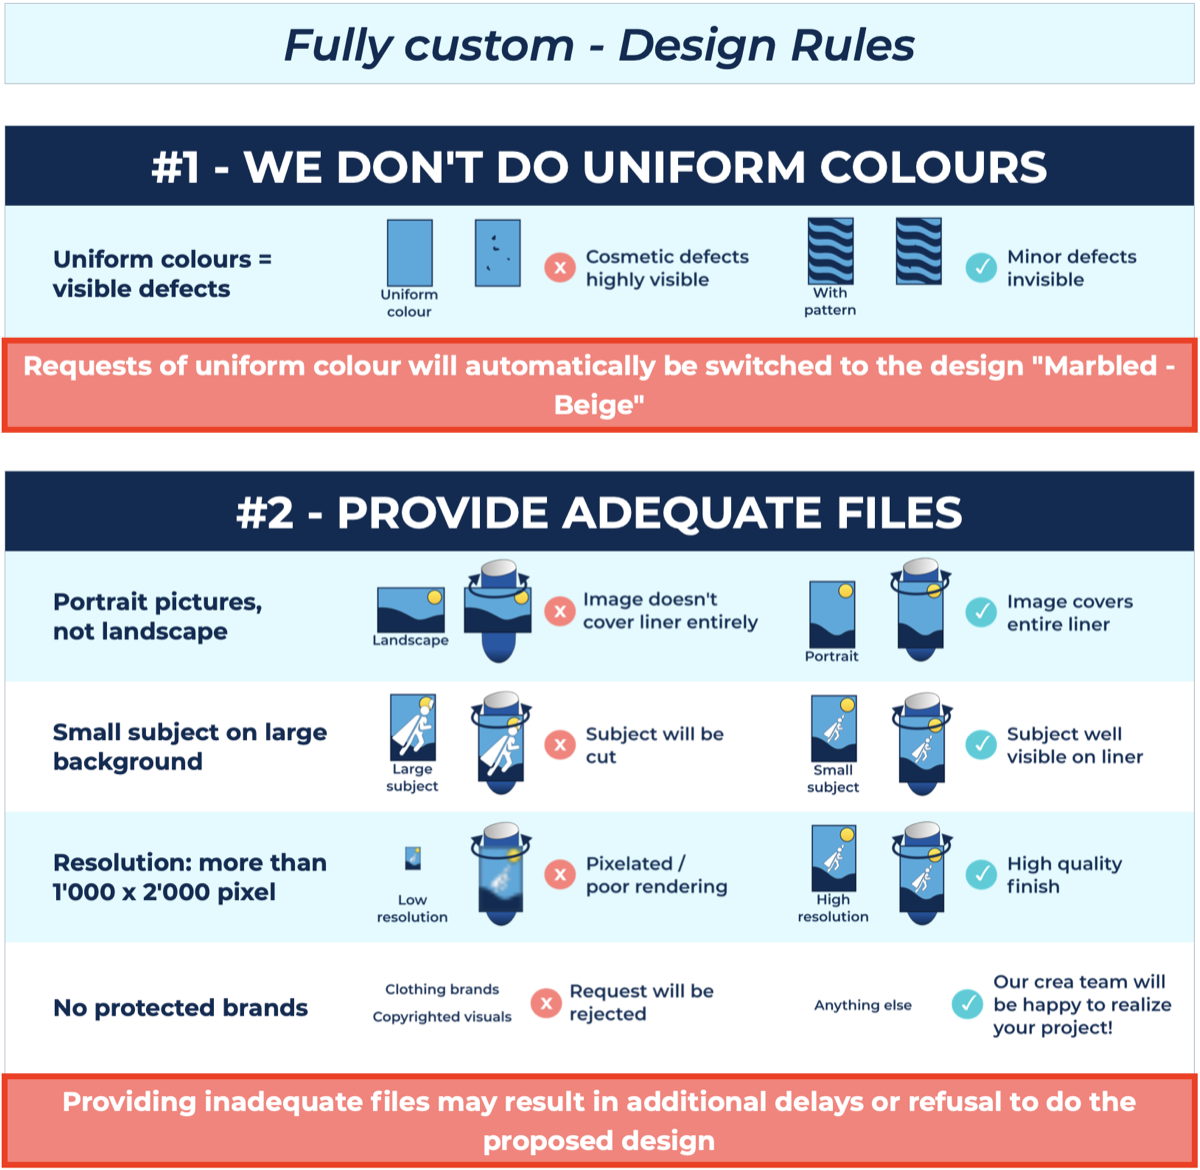
Other than that, you’re free to go wild! ☄️🚀🌅
How much do aesthetic customisation options cost?
Aesthetic customisation options do not imply any extra cost.
No matter what option you choose, be it from our catalog, the logo of your company, or any idea the patient has, the workload is essentially similar for us. So aesthetic customisation doesn’t cost more.
Can I get an extra textile with matching style to laminate on the socket for free?
Yes 😉
What is a compensated liner?
Pear-shaped limbs are limbs which present a prominence in a given area, and a narrower section in a more proximal area. Because of this, the limb can’t be easily inserted into a classical prosthetic socket.
Compensation liners are liners which include extra buildup in some areas to give a cylindrical shape once the liner is donned onto a limb.
Compensated liner or not?
Depending on the shape of the limb, a compensation liner might present buildups which are too extreme, and make the resulting liner too thick and therefore impossible to roll onto the limb.
On the contrary, if using a liner with zero compensation for a pear-shaped limb, the fabric might not be able to stretch enough to allow for the thin segment of the liner to go over the larger distal segment of the limb when rolling the liner on.
Several design parameters can be adjusted to facilitate donning, such as the used material, the applied reductions, or the suspension system.
MotionTech has developed an algorithm which can calculate the strength required to don & doff a liner, based on a given stump shape and the design choices. Depending their abilities (e.g. hand strength), different users will or won’t be able to don a liner which requires a given strength value. We can advise you on such cases!
Simply submit a classical order and write a comment asking for a “donning & doffing validation” prior to launching the print. We’ll get in touch once the analysis is conducted to discuss the best options.
Why is my compensated liner not properly compensating the pear-shape?
When we compensate a pear-shaped stump, we follow a simple rule:
A given perimeter can not be more than 0.5cm smaller than any other more distal perimeter
You have ordered a compensated liner, and when trying it on the patient you measure more than this difference? There can be several explanations:
#1 — Is the liner stretched vertically?
When rolling a compensated liner on the limb, the inside surface stretches out right before it comes in contact with the skin, which gradually stretches out the liner in the longitudinal direction when donning. This is accentuated by the thick pear-shape compensation pads.
This can typically occur for ankle disarticulation cases (e.g. Symes).
This vertical stretching leads to the designed thicknesses not being located where they are intended, which can result in an unsuitable pear-shape compensation.
You can check if the liner is stretched vertically on the limb by measuring the length of the liner between distal end and a reference point of your choice when relaxed and when donned.
To counter this longitudinal stretching effect, ensure you release the tension iteratively when you don the liner, as shown below:
Alternatively, you can apply cream on the limb prior to donning, to prevent the inner silicone surface from sticking to the skin, so the liner can get back to its natural length.
#2 — You tried the above and it still doesn’t work?
The error might then come from somewhere else. This could be from the scan, from the 3D modelling, from the way the tissues move during donning, or something else we didn’t anticipate.
In any case, you should take some videos, photos and measurements to illustrate the issue, and file a warranty claim. Our staff will contact you rapidly to discuss options to resolve the issue.
Do you ship in my country?
We’re working hard to make Your® Liner available worldwide without restrictions. It is already available in more than 20 countries and on 3 continents.
As the list is rapidly growing, check our List of partners directly. If you see companies within your country, Your® Liner is available in your country. If not, it still might be — contact us and ask!
What’s your production leadtime?
Our objective is to ship Your® Liner within 5 days of receiving the order. But with our on-demand manufacturing model, we sometimes get overwhelmed with many simultaneous requests.
In average, it takes us 8 business days to ship a new liner (where we need to design the 3D model), and 6 business days to ship a copy (where the 3D model already exists).
Our current production leadtime is displayed live directly on the Order Form. When placing an order, you see directly the expected shipping date, so you can plan the next steps ahead with the user.
From the moment the product is shipped from our production centre in Switzerland, shipping typically takes between 1 and 3 days in Europe, and 3 to 5 days out of Europe.
Working with Switzerland as a EU-based company
Switzerland is out of the EU, and our products therefore go through customs clearance before reaching your hands. Our teams have a lot of experience dealing with this and will guide you along the process.
When you place your first order, we’ll provide you with all the necessary info so you can receive our packages without headaches. We’ll also ask for some information about your company to set things up properly on our side.
Once this initial setup is done and you have done the process once or twice, things run smoothly.
Our goal: we’ll do our best to make you believe that we’re your next door neighbour!
What is a liner?
A prosthetic liner is a cushioning sock made of a soft elastomeric material, designed to be worn as interface between a residual limb and the weight-bearing prosthetic socket.
Functions of liners include improving comfort and suspension, as well as protecting the wearer’s skin.
Why different materials?
Prosthetic liners are typically made from three materials: polyurethane, thermoplastic elastomer (TPE), and silicone.
Polyurethane has the ability to “flow away” from high pressure, which can improve pressure distribution in the socket. If polyurethane is known to be a great material when it comes to comfort, it has been reported to absorb sweat, making it harder to maintain liners fresh and clean.
TPE, also called copolymer or gel is typically soft and highly elastic. It provides good protection for amputees with sensitive skin and/or lower levels of activity. For users of higher levels of activity, TPE tends not to be the first option, as it can display limited durability in some cases.
Silicone has been used in the medical industry for years thanks to its proven biocompatibility properties, and its chemical inertness. For prosthetics, the very wide range of available silicone materials make it a very versatile solution, able to match all kinds of needs. From very soft to hard, silicone can come in a wide range of rigidities to match any specific needs. Furthermore, silicone is typically a very hygienic material, which can be maintained clean more easily than alternatives.
At MotionTech we work only with silicone, as we believe that the very wide range of possibilities that the world of silicones offer enables to find optimal solutions for each individual user. Its biocompatibility and hygienic properties also make it the material of choice in our eyes.
But our opinion on the question, given our activities, might therefore not be the most unbiaised… 🙂
Why different suspension systems?
For the prosthesis to stay properly attached to the residual limb, there are several systems, called “suspension systems”. Three systems which are commonly used are:
Locking
The liner includes a pin at the distal extremity, which locks in a corresponding system in the prosthetic leg.
Vacuum
The socket includes a valve which can be opened to allow the air out when the residual limb is inserted into the socket, and can be closed afterwards. Another sealing element allows to create a seal with the socket, to maintain vacuum between limb and socket, so that the prosthesis stays properly attached to the limb. The sealing element can be a suspension sleeve (for below-knee users), or a seal element between the liner and the socket.
Anatomic
Some socket constructions allow for the socket to stay attached to the limb solely because of its shape. This typically only works with some specific limb geometries which allow for this natural suspension to occur, and can be assisted by using a “boa” system which allows to tighten the socket.
At MotionTech we provide solutions for all of the above suspension mechanisms. Moreover, the suspension components of our liners can be configured by the CPO for each individual user, to optimise the function of the liner and provide optimally suited suspension features.
Why are there standard and custom liners?
Most of the liners that prosthetic users are wearing are called standard or off-the-shelf liners. These are mass produced, usually by injection moulding, which enables better cost control in the manufacturing thanks to large scale operations.
Standard liners and mass production have been a key element of the progress of prosthetic technology, enabling to bring the benefits of prosthetic liners to many users at an affordable price.
Historically, custom liners were made mostly by plaster casting, mould making, and injection moulding. Due to the individualised approach, industrialising such a process has proven to be a difficult task, often leading to products with a lower “finish” quality, and a more expensive price.
With the generalisation of digitalisation and 3D printing, many industries have seen the rise of new approaches of mass-customisation, aiming at providing tailor-made products at a large scale, affordable price and without compromise on quality.
Thanks to our first-of-its-kind silicone 3D printing technology, we at MotionTech are pioneering this mass-customisation approach for prosthetic liners.
What is Your® Liner?
Your® Liner is the first 3D printed silicone liner for prosthetic users.
We at MotionTech have developed a unique silicone 3D printing technology, and are today leveraging this innovation to bring the most advanced prosthetic liner solution to date.
Your® Liner puts CPOs and users at the centre, by giving them the possibility to customise every aspect of the liner to optimally match the needs of each user.
- Shape: The shape of the liner is based on a 3D scan of its intended limb, and therefore optimally matches the unique shape of each user
- Thicknesses: Pads, filling of scars or concave areas, the local thicknesses of Your® Liner can be fully customised
- Silicone type: Your® Liner comes in 3 silicone types, from very soft to harder cushioning
- Suspension: The suspension elements of the liner can be configured and combined
- Aesthetics: The pattern or photo printed on the liner can be chosen from our catalog, or fully defined by the user
What’s the difference between Your® Liner and other custom liners?
What’s unique about Your® Liner is the fact it is 3D printed. In itself, additive manufacturing isn’t necessarily better. But it does allow to do things which are harder to do with other methods. Here’s how Your® Liner makes a difference:
#1 Thickness control
Many liners are made by manual mould making. If skilled craftsmen can get great results with those methods, the accuracy with which thicknesses can be controlled is still limited. A digital workflow allows to accurately control thicknesses and adapt them to specific user metrics (weight, activity level, local sensitivities, etc.) to bring optimal cushioning where needed.
Furthermore, some custom liners only have an inside custom shape, when the outer shape is standard. This simplifies manufacturing and can make sense in some cases.
Such liners however can provide too much or not enough thickness in certain locations, as the thickness only results from the difference between inside and outside shape. Your® Liner is fully built on the shape of the limb: the inside comes from the 3D scan, and the outside is the inside shape + paddings, so extra material is only located where it needs to be.
#2 Aesthetics
To our knowledge Your® Liner is the only custom liner which allows users to customise the aesthetics of the liner. You’ll tell us: what’s the point, the liner is under the socket?!
Well, you can also customise the rest of your prosthesis, to have uniform liner + socket style. And all this at 0 extra cost. All customisation options are included in the Your® Liner package price.
Is Your® Liner the right option for me?
We’d like to say OF COURSE, but we have to be honest: a custom liner is not always the best option. Indeed, with the current state of our silicone printing technology, our products remain expensive compared to alternatives.
Here is some food for thought to help you figure out if Your® Liner is the right option for you:
Insurance coverage
Insurance coverage varies substantially from country to country, sometimes even at the regional level. Our products are well covered in some geographies, much less in others. Check with your CPO or get in touch with us to get some specifics on the insurance coverage where you live.
Prosthetic experience
What other liners did you try before? Did you have issues with those liners? What would you have changed on these liners? If your previous liners felt great (and many do!), a Your® Liner might not be the right solution for you. But if you repeatedly had some issues, felt some local pain points, had repeated injuries in a location, or trapped air pockets between skin and liner, maybe Your® Liner can help solve these issues.
Specific prosthetic challenges
Your® Liner is great for solving some clearly identified prosthetic challenges which some (but not all!) users face. Maybe you do face one of these challenges — feel free to check it out to see if anything rings a bell!
! Read our Instructions for Use!
If you are using a Your® Liner, please read the Instructions for Use. You’ll find important instructions and precautions to follow to make sure you safely use Your® Liner.
Instructions for Use
How and when should I clean my Your® Liner?
Your® Liner should be cleaned daily with lukewarm tap water and pH neutral soap. It is best to use a mild, fragrance-free soap to clean your prosthetic liner. Harsh soaps or detergents can irritate the skin and damage the liner material. We also recommend disinfecting the inside surface of Your® Liner once a week with ethyl or isopropyl alcohol.
You can put Your® Liner in the washing machine, but beware not to use too long cycles and not to wash it at more than 40°C. Do not dry it in the drying machine. Beware that washing Your® Liner in the washing machine too frequently might generate premature wear.
Do not let Your® Liner dry inside out. Always leave it to dry with the fabric cover out.
For additional instructions on how to clean Your® Liner, please refer to the Your® Liner Instructions for Use manual.
How often should I replace my Your® Liner?
The lifespan of a prosthetic liner varies depending on the type of liner, frequency and intensity of use, and individual factors such as skin sensitivity and perspiration. It is recommended to replace your liner every six months or sooner if it shows signs of wear or tear.
How should I store my Your® Liner when I’m not using it?
Store your prosthetic liner in a clean, dry place away from direct sunlight or heat. Make sure you do not leave Your® Liner in a place where dust, sand, or other substances might contaminate the inside surface of the liner, as those might be difficult or impossible to entirely remove from the liner.
Avoid folding or crushing the liner, as this can cause it to lose its shape and effectiveness.
Avoid leaving the liner inside out. When storing it, always keep Your® Liner with the fabric cover towards the outside.
What should I do if my prosthetic liner becomes damaged?
If your prosthetic liner becomes damaged, it is important to stop using it and contact your prosthetist or healthcare provider, so they can assess the damage and determine if a replacement is necessary.
What scanner should I use for an Essentials liner?
 Essentials line behaves differently here
A structured-light scanner. For the Essentials line, dimensional accuracy of the scan is your responsibility — there is no Fit Warranty to fall back on.
Two further points specific to Essentials: we do not re-shape soft tissues by default, so it is on you to position them correctly at scan time (use a stocking), and a scan that still needs cleaning or reshaping on our side is handled as a separate service.
Open formats — STL, OBJ and PLY — are accepted across all lines. We advise against CPX and iMed for Essentials because of their dimensional uncertainty.
How does compression work on an Essentials liner?
Essentials line behaves differently here
Essentials applies our standard target compressions, derived from the sensitivity levels you indicate. These parameters are proven across a large number of fittings and suit most users — but not all, and it is your call whether they suit the individual in front of you.
If an Essentials liner does not achieve the fit or compression you wanted, there is no Fit Warranty. For a user with atypical compression sensitivity, the full thickness and compression control of a UniShore liner is the right tool from the start.
Can an Essentials liner handle a pear-shape?
Essentials line behaves differently here
No. Pear-shape compensations are not available on Essentials, and neither are Vertical Waves. If the pear-shape is what makes the case difficult, Essentials is the wrong line — use UniShore or DualShore.
What is the difference between Essentials, UniShore and DualShore?
Essentials line behaves differently here
Essentials applies our standard design parameters directly to your scan. The shape is fully custom to the limb, you can adjust the base thickness profile and the built-in knee pre-flexion, and you choose from our aesthetic catalogue.
What Essentials does not include: pads, scar fillings or pear-shape compensations; pin-lock or silicone-ring suspension; waves; editability; and no Fit Warranty.
UniShore adds unlimited localised thickness control — pad bony prominences, fill scars, compensate pear-shapes — plus the full suspension suite, vertical and horizontal waves, extended aesthetics, an editable 3D model, and the Fit Warranty.
DualShore adds localised Shore hardness control: soft silicone where you need stretch or comfort, firm where you need support, proprioception or durability. It is the only line covered by the Configuration Warranty.
When is Essentials the right choice?
Essentials line behaves differently here
Essentials typically suits irregular limb shapes, conical limbs, very large or very small limbs, and limbs that off-the-shelf liners fit poorly.
It may not suffice where the user presents sensitivities requiring padding, scars or invaginations requiring filling, pear-shapes requiring compensation, or abundant soft tissue and a distal pendulum.
How much thickness control do I have on each line?
Essentials line behaves differently here
Essentials: you control the base thickness profile, with no maximum thickness limit — but thickness is uniform around the limb at any given height. You cannot apply pads, scar fillings or pear-shape compensations.
UniShore and DualShore: unlimited localised thickness control. Pad bony sensitivities to avoid pressure peaks, fill scars to avoid air pockets, compensate pear-shapes to enable socket entry.
Sleeve from Measurements: thicknesses are pre-set and cannot be modified. Sleeve from Scan: fully adjustable, as on a UniShore liner.
Which suspensions can I specify on each line?
Essentials line behaves differently here
Cushion is available on all product lines. Pin-lock and silicone rings — for in-socket vacuum and anti-rotation — are available as options on UniShore and DualShore only.
Essentials liners are Cushion only: no pin-lock, no silicone rings. If the case needs an active suspension, Essentials is not the right line.
Can I change the thickness on a renewal?
Essentials line behaves differently here
Yes. A minor modification to an existing 3D model — for example increasing reductions on a renewal liner — is possible for UniShore, DualShore and Sleeve from Scan. Essentials liners cannot be edited: if the limb changes you start over from a new scan.
Can an existing liner be modified?
Essentials line behaves differently here
UniShore and DualShore models are editable — you can adjust the shape and properties as the limb volume and the user’s needs evolve, which is what lets you keep a user going in an existing socket.
Essentials liners cannot be edited. If the limb changes, you start over from a new scan and a new order.
Which warranty applies to which product?
Essentials line behaves differently here
Three distinct warranties, cumulative in scope:
| Warranty | What it covers | Applies to |
|---|---|---|
| Product Warranty | Defects in material and workmanship | All Your® products |
| Fit Warranty | Fit and compressions on the limb | UniShore & DualShore liners, Sleeves from Scan |
| Configuration Warranty | Suitability of the chosen configuration | DualShore liners |
Your® Liner Essentials and Your® Sleeve from Measurements are covered by the Product Warranty only. For these, fit and compression outcomes are not warranted.
What does the Fit Warranty actually cover?
The case where a product manufactured to the specifications we confirmed does not achieve an appropriate fit or compressions on the limb.
Importantly, dimensional or geometric inaccuracy of a scan produced in accordance with our scanning instructions is covered. Follow the instructions and the scanning risk is ours, not yours. That is the practical difference between UniShore and Essentials.
Two conditions: the scan was produced per our scanning instructions, and the limb has not changed in volume or shape since the date of the scan. It does not cover fit problems attributable to the socket, the components or their assembly.
On unstable limbs — early post-op, active volume loss — scan as close to the order date as you can. A limb that changed after the scan is the single most common reason a claim fails.
What is the regulatory status of the product?
Your® Liners and Sleeves are custom-made devices, manufactured to a specification you provide for an individually identified user. Swiss Motion Technologies SA is the legal manufacturer of every product.
When a delivery arrives, check that the accompanying documentation is complete, that the manufacturer and any authorised representative are identified on the product, its packaging or the documentation, and that the Instructions for Use are supplied in the required language.
Do I need to anonymise patient data before sending it?
Yes, and it matters. All data transmitted to us must be anonymised before transmission. The patient identifier you provide must not permit identification of the patient, and no file you send — 3D scans, images, clinical documentation — may contain personal data or metadata identifying the patient.
Check your scanner’s export settings: patient name and date of birth are commonly embedded in scan metadata. You do retain the link between the anonymised identifier and the user — that is required for traceability.
Who owns the 3D model?
We do. All 3D models, designs and manufacturing files we create — including those derived from a scan or measurements you provide — remain our exclusive property. You acquire the right to use the delivered product, not rights in the underlying models or files.
How long do you keep my scans?
For the period required by the applicable medical device regulations, and we process the data for manufacturing, quality assurance, regulatory compliance, warranty handling and the production of renewal products.
What must I report to you, and how fast?
Within 2 working days of becoming aware: any incident, malfunction, deterioration in performance, or inadequacy in the Instructions for Use that has led or might have led to death or a serious deterioration in the health of the user or anyone else.
Promptly, without a fixed deadline: any complaint, adverse skin reaction or product failure below that threshold, so we can maintain post-market surveillance.
You also need to maintain a register of complaints, non-conforming devices, recalls and withdrawals for the products you receive, and traceability records linking each product to the user and to our order reference.
Do I have to give the user the Instructions for Use?
Yes. You must make the applicable Instructions for Use available to the user and instruct them in correct use, care and maintenance.